

Product Overview
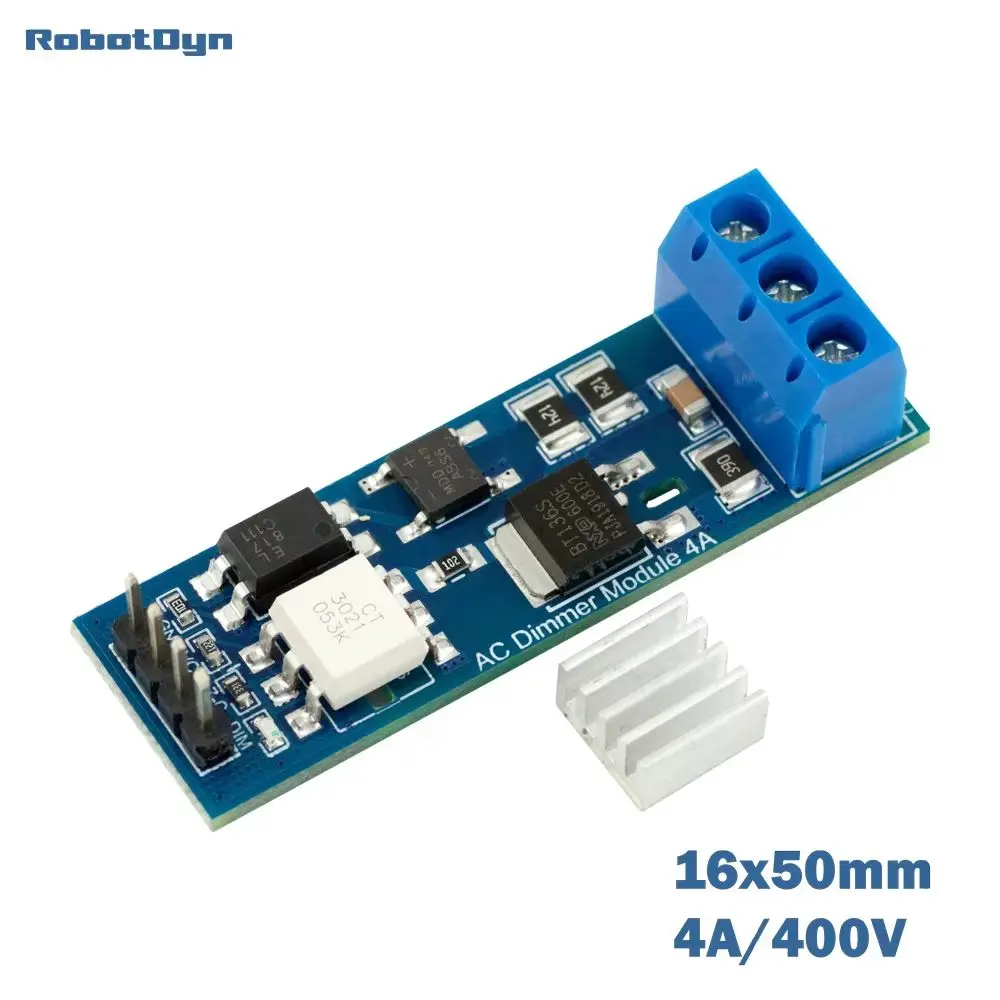
The AC Dimmer is a DIY module — not a finished device — that you integrate into your project by connecting it to your microcontroller. Designed to regulate alternating current (AC) voltage, it safely handles up to 4A (880W at 220V). Originally designed for smooth control of lamps and heating elements — not merely simple on/off switching — this compact module also supports adjustable operation for fans, pumps, air purifiers, and more.
This dimmer is especially useful for smart home projects. With our comprehensive tutorials and user guides, you can build a fully customized solution. For example, you might:
- Adjust lighting: Gradually turn lights on or off to create a comfortable ambiance — perfect for bedrooms, living rooms, and mood lighting.
- Automate your home: Connect the module to cloud services like Home Assistant or even control it with voice assistants.
- Control fans and pumps: Adjust ventilation speed or water pump flow for aquariums, irrigation, and cooling systems.
- Save energy: Program schedules for turning devices on and off, reducing energy consumption.
We provide extensive documentation and instructions not only for Arduino but also for other platforms. You can find guides on using the ESPHome component for integration through Home Assistant, as well as detailed instructions for Tasmota.
🔌 CHOOSE YOUR INTERFACE
| Feature | Standard (Phase Control) | DimmerLink (UART/I2C) |
| Interface | Zero-Cross + Gate signals | UART (115200) or I2C |
| Library Required | Yes (rbdimmerESP32.h) | ❌ No library needed |
| Code Complexity | Interrupt handling, timers | 3-4 bytes command |
| Flickering | Depends on code quality | ✅ Guaranteed flicker-free |
| Platform Support | ESP32, Arduino (with library) | Any MCU with UART/I2C |
| Logic Levels | 3.3V, 5V | 1.8V, 3.3V, 5V |
| Best For | Advanced users, custom timing | Beginners, quick integration |
⚠️ HOW TO IDENTIFY YOUR VERSION
When ordering, select carefully:
| You Selected | You Will Receive | Interface Pins |
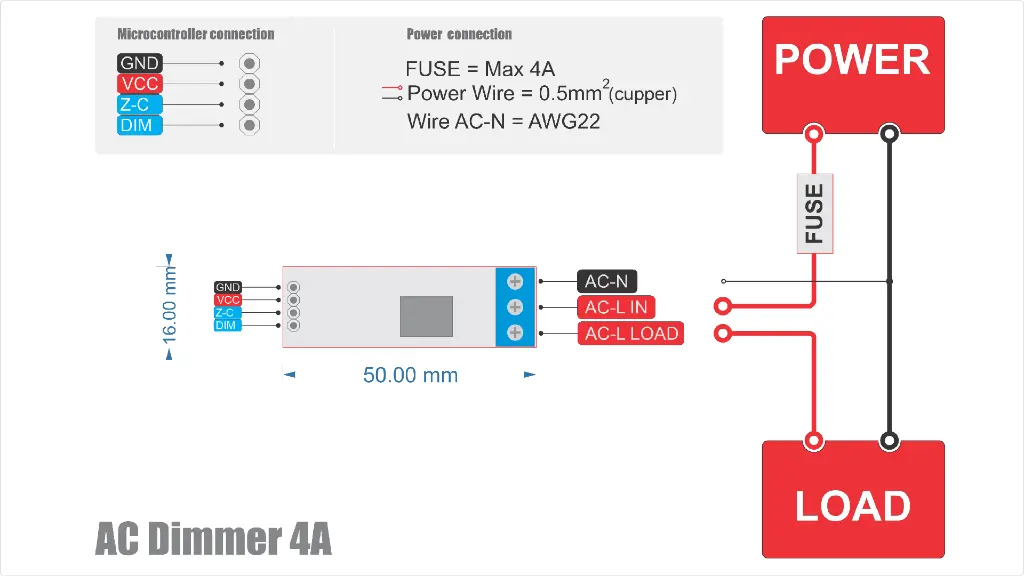
| 4A Standard | Dimmer with Phase Control | VCC, GND, Z-C, DIM |
| 4A DimmerLink | Dimmer with built-in controller | VCC, GND, TX/SDA, RX/SCL |
🎯 WHICH VERSION IS RIGHT FOR YOU?
✅ Choose STANDARD (Phase Control) if you:
- Already use rbdimmerESP32 library in your project
- Need lowest possible cost
- Want direct hardware control
- Building multi-phase systems
- Experienced with interrupt-based programming
✅ Choose DIMMERLINK (UART/I2C) if you:
- Want plug-and-play simplicity
- Need guaranteed flicker-free operation
- Using Raspberry Pi, Orange Pi, or any Linux SBC
- Working with platforms without dimmer libraries
- Building smart home with Home Assistant / ESPHome
- Want to control via USB-UART adapter from PC
- Prefer minimal code (literally 5 lines!)
📋 SPECIFICATIONS
| Parameter | Value |
| Max Current | 4A |
| Max Power (220V) | 880W |
| Max Power (110V) | 440W |
| Max Voltage | 400V AC |
| AC Frequency | 50 / 60 Hz |
| TRIAC | BTA136 |
| Isolation | Optocoupler |
| Logic Levels | 3.3V / 5V / 12V (Standard) — 1.8V / 3.3V / 5V (DimmerLink) |
| Signal Current | >10 mA |
| Mounting | Standard 0.1" (2.54mm) pins |
| Weight | 10 g |
| Dimensions | 60 × 20 × 20 mm |
| Environment | Indoor and outdoor, −20°C to 80°C, dry only |
| ROHS3 | Compliant |
🔧 STANDARD VERSION — Phase Control Interface
How It Works: The Standard version outputs two signals: Z-C (Zero-Cross) — pulse at each AC zero crossing, and DIM (Gate) — you send trigger pulse to fire TRIAC. Your microcontroller must detect zero-cross interrupt, calculate delay based on desired brightness, and send precisely-timed gate pulse — 100-120 times per second.
Requires Library: We provide rbdimmerESP32.h library that handles all timing complexity.
#include <rbdimmerESP32.h>

dimmerLamp dimmer(4, 2); // Gate pin, ZC pin

void setup() {
  dimmer.begin(NORMAL_MODE, ON);
}

void loop() {
  dimmer.setPower(50); // 50%
}
Supported Platforms:
- ✅ ESP32, ESP8266 — Full library support
- ✅ Arduino Uno/Mega — With limitations
- ⚠️ Raspberry Pi — Requires precise timing, difficult
- ❌ Most other platforms — No library available
🚀 DIMMERLINK VERSION — UART/I2C Interface
Revolutionary Simplicity: DimmerLink has a dedicated Cortex-M+ microcontroller built into the dimmer board. This controller handles ALL timing-critical operations internally: zero-cross detection, phase angle calculation, TRIAC firing with microsecond precision, automatic 50/60Hz detection, and multiple dimming curves. You just send simple commands!
No Library Required — Ever!
Arduino Example (I2C):
#include <Wire.h>

void setup() {
  Wire.begin();
}

void loop() {
  Wire.beginTransmission(0x50);
  Wire.write(0x10); // Brightness register
  Wire.write(50);   // 50%
  Wire.endTransmission();
  delay(1000);
}
Python Example (Raspberry Pi):
from smbus2 import SMBus
bus = SMBus(1)
bus.write_byte_data(0x50, 0x10, 50)  # Set 50%
Even from Terminal (Linux):
i2cset -y 1 0x50 0x10 50 # Set brightness to 50%
DimmerLink Key Advantages:
- 🔇 FLICKER-FREE — Hardware handles timing, impossible to flicker
- 📚 NO LIBRARIES — Works with ANY programming language
- 🌐 UNIVERSAL — Arduino, ESP32, Raspberry Pi, STM32, PIC, anything!
- ⚡ 1.8V-5V Logic — Direct connection to any MCU
- 📊 3 Dimming Curves — LINEAR, RMS (incandescent), LOG (LED)
- 🔄 Auto Frequency — Detects 50/60Hz automatically
- 🔌 Dual Interface — Switch between UART and I2C anytime
Supported Platforms (ALL of them!):
| Platform | UART | I2C | Logic Level |
| Arduino Uno/Nano/Mega | ✅ | ✅ | 5V |
| ESP32 / ESP8266 | ✅ | ✅ | 3.3V |
| Raspberry Pi 3/4/5 | ✅ | ✅ | 3.3V |
| Orange Pi / Banana Pi | ✅ | ✅ | 3.3V |
| STM32 Blue Pill | ✅ | ✅ | 3.3V |
| Raspberry Pi Pico | ✅ | ✅ | 3.3V |
| ATtiny / nRF52 / MSP430 | ✅ | ✅ | 1.8V |
| USB-UART adapter (PC) | ✅ | — | Any |
💡 APPLICATION EXAMPLES
🏠 Smart Home — Both versions work with Home Assistant. Standard uses ESPHome dimmer component, DimmerLink uses simpler I2C/UART component.
💡 Lighting — Incandescent bulbs (RMS curve), dimmable LEDs (LOG curve), halogen lamps (RMS curve). The 4A module handles most household lighting — up to 880W at 220V.
🌀 Fans & Pumps — Ventilation fans, exhaust fans, aquarium pumps, irrigation pumps. Adjust speed smoothly instead of noisy on/off cycling.
🔥 Small Heaters — Soldering station temperature control, small heating elements, 3D printer heated beds up to 880W.
⚙️ Motors — Universal/brush motors (drills, mixers). ⚠️ NOT for induction motors!
⚡ QUICK COMPARISON: Code Complexity
Setting 50% Brightness
Standard Version (ESP32 with library):
#include <rbdimmerESP32.h>
dimmerLamp dimmer(4, 2);
void setup() { dimmer.begin(NORMAL_MODE, ON); }
void loop() { dimmer.setPower(50); }
Requires: Library installation, correct pin configuration, understanding of interrupt modes
DimmerLink Version (ANY platform):
Wire.beginTransmission(0x50);
Wire.write(0x10);
Wire.write(50);
Wire.endTransmission();
Requires: Nothing! Just 4 lines, any I2C-capable device
❓ FAQ
- Q: What's the difference between 4A and 8A modules? A: The 4A module uses a BTA136 TRIAC and handles up to 880W at 220V — ideal for lighting, fans, and small heaters. The 8A module (BTA16-600B) handles up to 1760W for larger loads like boilers and industrial heating elements.
- Q: Can I use Standard version with Raspberry Pi? A: Technically yes, but very difficult. Raspberry Pi OS is not real-time, causing timing issues and flickering. DimmerLink is strongly recommended for Raspberry Pi.
- Q: Is DimmerLink compatible with existing rbdimmerESP32 projects? A: No, they use different interfaces. DimmerLink uses UART/I2C commands instead of phase control signals.
- Q: Can I switch DimmerLink between UART and I2C? A: Yes! Send a command to switch interface. Setting is saved in memory.
- Q: What if I need to control multiple dimmers? A: Standard: Each dimmer needs separate GPIO pins. DimmerLink (I2C): Up to 100+ dimmers on same 2 wires (different addresses).
- Q: Which version has less flickering? A: DimmerLink — zero flickering guaranteed. Standard version depends on your code quality and MCU performance.
- Q: Is the 4A module enough for my lamp? A: Most household lamps are well under 4A. A single incandescent bulb is typically 60-100W (0.3-0.5A at 220V). You can run several bulbs totaling up to 880W at 220V or 440W at 110V.
📦 PACKAGE CONTENTS
Standard Version: 1× AC Dimmer Module 4A, Pin headers (soldered)
DimmerLink Version: 1× AC Dimmer Module 4A with DimmerLink controller, Pin headers (soldered)
⚠️ SAFETY WARNING
This is a DIY module for experienced users. Works with dangerous AC mains voltage (110-240V). Proper isolation and enclosure required. Follow local electrical codes. Not for use by children.
Documentation
- Dimmer Selection Guide — how to choose the right module
- Wiring & Hardware Connection Diagram
- rbdimmerESP32 Library — Arduino & ESP-IDF guide
- ESPHome External Component
- DimmerLink Documentation — UART/I2C commands and examples
Resources
- GitHub: RBDimmerESP32 — especialy for ESP32 library, RBDDimmer — Alrduino boards library
- AliExpress: Buy from RBDimmer official store
- Amazon: AC Dimmer Module 8A on Amazon